
Our high quality commercial-grade lights allow you to create your own custom roofline lights for your home. This gives you the ability to achieve a highly professional-looking installation. Learning to use our products is fairly simple, and we've written out the steps for installation below so that there's no room for error!
Find the right products for your style
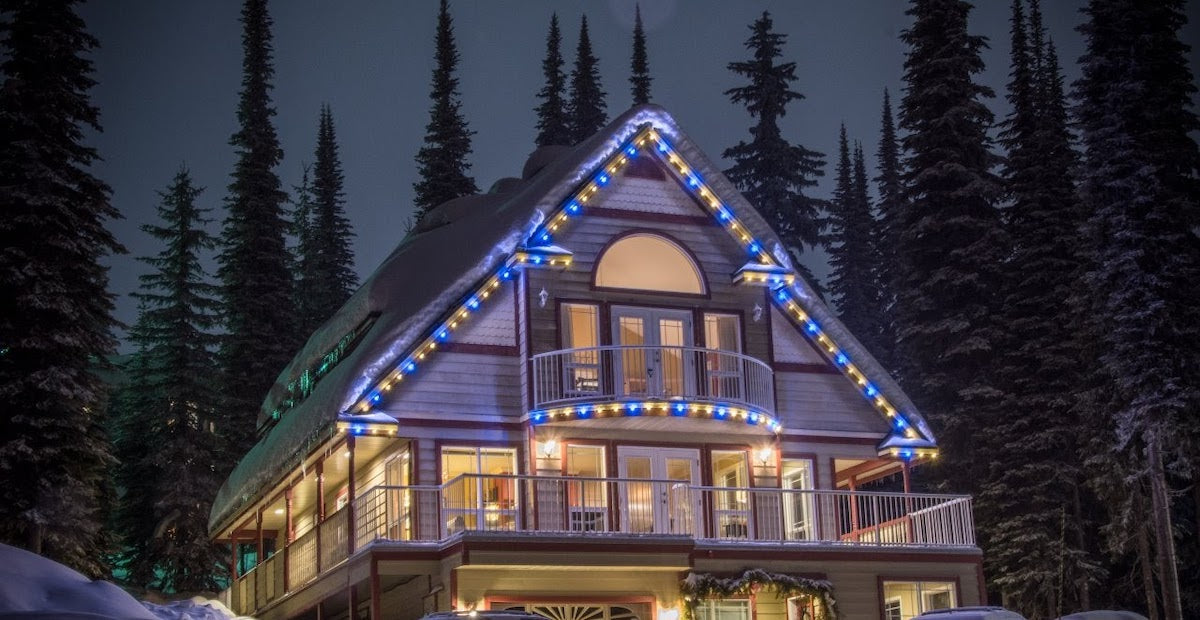
There are a lot of different types of Christmas lights on the market. For a standard roofline installation, you'll want a combination of socket wire and retrofit bulbs.
Socket Wire

Most people opt for E17 socket wire for their home's roofline, as it matches the standard C9 Christmas bulb. However, if you want to opt for smaller lights, go for E12 socket wire. We have a variety of colours available so that you can closely match the colour of your roofline.
There are a variety of lengths and socket spacings available to suit your needs and the size of your home. All of our socket wire is flat, on SPT-2 insulated wire. This allows you to cut the line and attach plugs easily, and helps you to orient bulbs all in a straight line for a professional look.
Bulbs
C9s are the traditional choice for the holidays, but many people now opt for the modern G30 globe-shaped bulb. Choose whichever bulb style resonates with you, and have fun with color or opt for a traditional warm or pure white. For a full list of our bulb types and the socket wire they are compatible with check out our blog Decoding Christmas Lights and Decorative Bulb Sizes.
Clips
Our most popular style of clip is our Multi Clip, which can be used on gutters, shingles, glass awnings, fences, and more. There's always the traditional cradle-style clip, or for an upgrade try the TuffClip. Stylistically, the Multi Clip is very discreet. The clip attaches to the wire rather than the bulb, holding the light string flush with the roofline. Cradle clips and TuffClips elevate the bulb above the roofline.
Watch: Which Clip is Right for Me?
Zip Plugs
In order to customize your lights, zip plugs are necessary! Don't be intimidated by the idea of cutting the wire - it's simple and safe to do for temporary light installations over the holidays.
Power Cord
If you want to further elevate your installation, consider making your own extension cords as well with our 100 ft power cord sections. These can be used with the zip plugs to create connections - short and long - between your lights. This means no awkward lights strung between sections of roofline. You can even make discreet connections from your main roofline up to another feature like a dormer window.
Other Tools Required
- Wire cutters to help you attach the zip plugs to your wire.
- Ladders to help you get to all the right places.
- Safety gear like gloves and eye protection don't hurt either!
Installing Your Lights
Since you will be cutting lights, just a reminder to NEVER CUT A LIVE WIRE. A live wire is any wire that is plugged into an outlet. Always unplug your wire before cutting it.
First time using zip plugs? Review the below before continuing with your installation.
Watch: How to Install a Zip Plug
Read More: An Introduction to Zip Plugs for Christmas Lights and How to Use Them
1. Pre-bulb your lights

It's always easiest to hang your lights with the bulbs already on them! Our wire and bulbs are sold separately so that you can create your own colour scheme, but we recommend pre-bulbing your strings so that you spend less time on the ladder. This is a good time to test the bulbs, too. If you're using wire that has plugs pre-installed, easy peasy. If you're using one of our big 500 ft spools, you can safely attach a male plug to the accessible end of the spool and plug it in to a power source to test your bulbs. Just beware that the other end of the spool will be live.
2. Find your power source
This is where you'll want to start your installation - from your outlet (or outlets) of choice. If you will be using more than 250 ft of lights in your installation, you'll want to use more than one plug (two plugs on the same outlet are fine). If your power source is not in a convenient location, you'll want to think about using a timer.
Read More: Christmas Light Installation: Power, Lengths & Circuits
3. Make your extension cord from your power source to the starting point of your roofline lights

Be sure to give yourself enough wire to tuck it away discreetly into the corners of your home, or wrap around a downspout. Be careful to also give yourself enough wire so that there's a U-shaped bend in the wire before it plugs into the power source. Having a wire leading directly downward into a plug creates a convenient drip line, meaning water can get into your connection and corrode it. Once you've carefully considered the length you need, cut your wire and attach a male plug at one end, and a female plug at the other.
Read More: How to Make a Light Duty Extension Cable
Watch: How To Make An Extension Cable With SPT2 Wire & Zip Plugs
3. Start attaching your roofline lights
If your socket wire does not have pre-molded plugs, start by attaching a male plug to your roofline lights. Then, using your clip of choice, start fixing your roofline lights along your gutters or shingles with one clip per light. Once you reach the end of a roofline section, you'll want to trim the wire. Pull out your wire cutters and DOUBLE CHECK THAT YOUR LIGHTS ARE NOT CONNECTED TO POWER before making a cut in the wire. Once you're confirmed the wire is not live, cut it and attach the female plug.
4. Continue to the next section
If you need to continue ahead to another section of your roofline, grab the rest of your power cord to create a new extension cord, or use a pre-fabricated one. Run the extension cord along to your next section of roofline and then continue with your pre-bulbed socket wire.
Every single section of roofline lights and extension cord should be complete with a male plug at one end and a female plug at the other. Never make an extension cord with two male plugs - one of the plugs will be live and poses a shock risk.
5. Creating a "T" in your line
Have you ever lamented needing to run multiple extension cords to different parts of your home? You can create a "T" in any SPT-2 extension cable or socket wire on your home. If you take a close look at our female zip plugs, you'll notice that one end has a tab that's removable. By clipping this tab off, you can apply the female plug anywhere along the line - not just at the end!
We'll use the image of a dormer below to explain when this might come in handy.
Red lines = Power cord (extension cable)
Yellow lines = Socket wire
Red circles = Regular female to male plug connections
Blue circles = In-line female to male plug connections

In this example, a female in-line plug has been used near the end of the main extension cord coming from the power source (the red line coming up from the bottom right. This means you can run power easily to the dormer with another small section of power cord, without needing a completely separate extension cord from the power source. There is also an in-line plug attached to the main roofline lights to run a small piece of extension cord to the window feature below.
6. Double-check your work and plug it in!

The best part of working on your holiday lighting display is plugging it in to take in all of its glory! But before you do so, make review your installation and make sure you've finished all of your lines with female plugs. Be sure that none of your plugs are in places where they'll be susceptible to moisture build up.
Removing Your Lights
1. Take a photo
Before taking your lights down at the end of the season, we recommend taking a photo of your home with the lights on it to serve as a reminder of where everything goes. You'll thank yourself the following season!

2. Label your strings
When you do take everything down, label your light strings to describe where they were on the house. If you're tech-savvy, you can mark up the photo you took with a "map" of sorts, and give each string a code like "R1" for the first roofline" and "R1 to R3" for extension cords.
3. Store your lights properly
Proper storage is paramount to your Christmas lights lasting a long time. If you take your lights down in the rain or snow, be sure to bring your lights indoors to dry off before tucking them away.
When wrapping up your lights at the end of the season, string lights can be tightly bundled into balls starting at the female end. Next season, the male end will be on the outside, meaning you can plug it right back in and roll out from there.
For larger roofline lights, loop them like you would a heavy duty extension cord or guitar amp cord. For really long strings, you may want to consider picking up a spool at your local hardware store.
We recommend storing your Christmas lights in a breathable tote (i.e. one with a hole or holes in it) in a temperature controlled space.
If you ever have any questions about working with our lights or need help troubleshooting your installation, please don't hesitate to reach out in our online chat or contacting us.